Posts

Showing posts from January, 2019

First month of construction! Vertical stabilizer in progress

Image
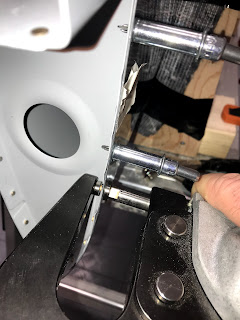
Suddenly one month has passed😊  The double sided tape ( 3M F9460PC ) was not in the shipment from Amazon on Tuesday, so I had to proceed with the horizontal stabilizer instead. But I was able to complete a few forward steps and prepare for riveting. The counterweight with the nutplate strip. This is the setup to rivet the trailing edge. I've prepared the tool from Cleaveland Aircraft Tool, by turning the set 180 degree. This tools is supposed to be used on the trailing edge of the elevator, but I've read that it can be used on the rudder as well. It looks good, but I haven't tested it yet. I've made some good progress on the vertical stabilizer (22 hours so far). It's a lot of deburring (and countersinking), and I'm constantly speculating on how to do this as efficiently as possible. So this time I tried out a few different approaches on how to reach the narrow spaces in the ribs, and came up with 3D printed disc to mount a 6" cut ...

Inspection, completion of vertical stabilizer, and progress on rudder

Image
Today I had the first visit from Gunnar Iversen  to check my work so far on the vertical stabilizer and the rudder. He was happy so I could proceed to close both. Vertical stabilizer I did rivet the the aft spar onto the rest of the structure with no major problem. Except that is's a bit difficult to reach the 4 AD426 along the middle hinge bracket. I managed it by using the angled side of the tungsten bucking bar from the Cleaveland tool kit. Also the two outer AN470AD4 rivets on to the root rib was a bit difficult to rivet and hold together at the same time. Rudder The rudder is ready for riveting, but I can't proceed before the double sided tape ( 3M F9460PC ) for the trailing edge arrives. That should be on Tuesday. The trailing edge was countersinked with the special countersinker from Cleaveland tools. The skin is ready for riveting. I've also 3D printed the templates to form the leading edge. I got them from the PDF version of the dr...

Rudder - priming, dimpling and riveting

Image
The rudder progress is good😃 I made a template from a piece of wood to drill the the leading edge at correct angle. All parts ready for priming. I had problem with my spray gun. It was sputtering, and that led to bad covering on the skins. So I decided to scuff them lightly and and apply a second coat. I also did some fixup with a brush on the other parts. Frame finished. Detail of the lower aft part. Lower forward party with the tie-wrap clip. A lot of dimpling using both the c-frame and preferably the pneumatic squeezer when possible. First R-00915 stiffeners back riveted in place. When doing the training kit I twice missed the backing plate and damaged the skin. So I come up with an idea to use a laser to indicate the center of the plate. So far no misses😊 Build time so far Below is a snap shot of the build time so far. I'm using ATracker pro for time tracking.

The rudder begins to take shape

Image
The rudder is coming together. A lot of cutting and deburing of parts in the beginning, but now I'm over to assembling, final drilling and machine dimpling. Dimpling of the skin I will do after priming. The skeleton coming together with the rudder horn and bottom rib clecoed together. The right hand skin deburred and scuffed The complete skeleton A close up of the bottom part with the rudder horn. I hadn't fluted the the tip rib properly, so I had to adjust it a bit to get it to fit nice to the skin. Right hand skin clecoed on. Then the left skin. All holes in the trailing edge is clecoed and the next is to match drill all the holes.

Vertical Stabilizer ready

Image
Today I finished riveting the skin on vertical stabilizer frame. I can't rivet the rear spar before after inspection. It should not take more than a hour to do after inspection. Total time 27 hours. Using the squeezer makes riveting easy and perfect every time. The finished component😊   The rear spar is only clecoed on for now. A look inside. A now on to the rudder! Most of the parts on the table (except the skins). 

Vertical Stabilizer - progressing

Image
The vertical stabilizer is almost finished. Here are some photos of the progress. Dimpling with the squeezer. The rear spar and doubler countersink'd and dimpled. The doubler on the front spar riveted.   Back riveting the AD426-4 flush rivets. I later found it easier to use the squeezer, and used that on the hinges. Using the squeezer on the AD470 rivets. All finished. I've read about other using laser to guide during dimpling of large skins. And as I had a laser diode lying around, I constructed a fixture in the CAD and printed it on the 3D printer. The skin all dimpled. Close up of the laser diode fixture for the C-frame dimpler. The frame is riveted together. It was a bit difficult to rivet the two lower ribs to the front spar. I had to mix a some primer because I had done some sloppy work during spraying. I had to create a fixture to easily rivet the skin. And it turned out to work ok. I've now completed...